Data Fetcher Help Center
🚀 Try for free📮 Support
  • 👋Welcome
  • Create Requests
    • Create a request
    • Use table values in requests
    • Use variables in requests
    • Response field mapping
    • Schedule a request
    • Add a request trigger
    • Troubleshoot errors
    • Run request using webhook URL
    • List of Airtable integrations
  • Custom Requests
    • Create a custom request
    • Set request method
    • Set request parameters
    • Request authorization
    • Set request headers
    • Add request body
    • Connect to a preset OAuth API
    • Create a custom OAuth connection
  • Advanced settings
    • Write modes
    • Update based on field(s)
    • Pagination
    • Response data transformations
    • Response JMESPath
    • Add fixed value to output
    • No output mode
    • Rate limit
    • Max response records
    • Run request from button field
    • Denormalize response
    • XML array handling
    • Fixed IP Address
  • Organise Requests
    • Run history
    • Duplicate a request
    • Delete a request
    • Add request description
    • Import request from cURL command
    • Export requests as JSON file
    • Import requests from JSON file
  • Create Sequences
    • Create a sequence
    • Schedule a sequence
    • Run sequence from button field
    • Run sequence using webhook URL
  • Account
    • Upgrade workspace
    • Authorize Data Fetcher and Airtable
    • Add user to workspace
    • Roles and permissions
    • View monthly usage
    • Update name or email address
    • Update payment card
    • Update billing information
    • View invoices
    • Switch workspace
  • Get a Google Maps API key
Powered by GitBook
On this page
  • Enable the Webhook URL for a Sequence
  • Run sequence for a specific record
  • Set up an Airtable automation
  1. Create Sequences

Run sequence using webhook URL

Last updated 9 days ago

A webhook URL allows you to run a sequence automatically when specific events occur, such as when an Airtable record updates or when someone submits a form.

To use webhook URLs, you will first need to .

Note: This feature requires a paid Data Fetcher plan.

Enable the Webhook URL for a Sequence

To make your sequence runnable via webhook URL:

  1. On the sequence screen, click the Webhook URL tab.

  2. Toggle on Turn on webhook for sequence.

  3. Click the clipboard icon (📋) to copy your unique webhook URL, which looks like:

https://hook.datafetcher.com/h/sr4X86TTJ747CAPj9gVU9mrKnN33wKqT46CbaaTxnaXqsr
  1. Test your webhook by visiting the URL in your browser - you should see a success message and the sequence will run immediately.

Run sequence for a specific record

To run your sequence for just one particular record:

  1. Make sure all requests in your sequence use the same Run on Multiple Records table.

  2. Add the record_id parameter to your webhook URL like this:

https://hook.datafetcher.com/h/sr4X86TTJ747CAPj9gVU9mrKnN33wKqT46CbaaTxnaXqsr?record_id=reca19WnKiU2L46cj
  1. The record ID used must belong to a record in your specified table

Set up an Airtable automation

You can trigger your sequence from Airtable automations when specific events occur:

  1. In Airtable, create a new automation with your desired trigger (e.g., When a record is updated).

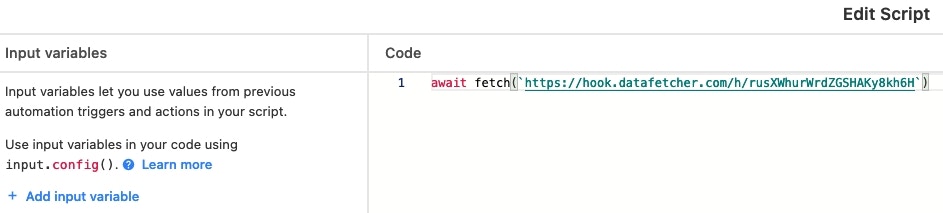
  2. Add a Run a script action.

  3. Paste the following code into the script, replacing YYOUR_WEBHOOK_URL with your sequence's webhook URL:

await fetch(`YOUR_WEBHOOK_URL`);
authorize Data Fetcher and Airtable